Welcome to the Ashley Baystorm bed assembly guide! This comprehensive resource helps you efficiently assemble your Baystorm bed, ensuring a sturdy and stylish final product.
Overview of the Ashley Baystorm Bed
The Ashley Baystorm Bed is a stylish and functional furniture piece designed to elevate your bedroom decor. Featuring a driftwood-inspired smoky finish and rustic accents, it blends coastal charm with modern sophistication. Available in various sizes, including queen, king, and twin, this bed offers versatility for different room layouts. The Baystorm Bed is known for its panel bed design, incorporating storage drawers for added convenience. Its sturdy construction ensures durability, while the optional LED lighting adds a sleek, contemporary touch. Perfect for creating an island oasis, this bed combines practicality and aesthetics, making it a popular choice for those seeking a relaxing and organized sleeping space.
Importance of Following Assembly Instructions
Importance of Following Assembly Instructions
Following the assembly instructions for the Ashley Baystorm Bed is crucial for ensuring a safe, stable, and durable final product. Proper assembly prevents structural issues, such as wobbling or unevenness, which can lead to safety hazards. The instructions are designed to guide you through each step methodically, minimizing the risk of errors. Additionally, adhering to the provided guidelines helps maintain the product’s warranty, as improper assembly may void coverage. By carefully following the instructions, you can achieve a professional-level result, ensuring your bed is both functional and aesthetically pleasing. Taking the time to follow the steps ensures a hassle-free assembly process and long-term satisfaction with your purchase.
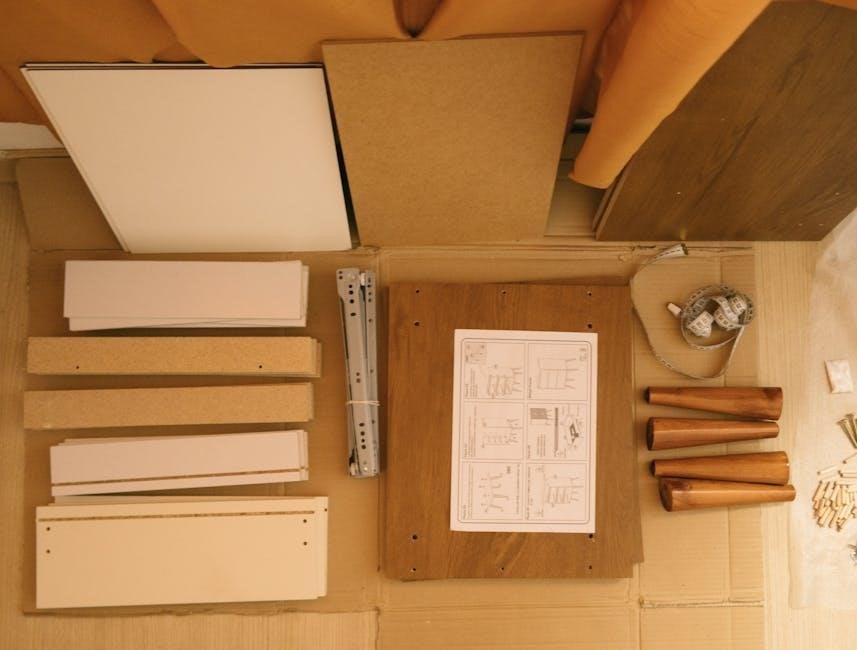
Components and Tools Required
The Ashley Baystorm bed assembly requires specific components like headboard, footboard, side rails, and hardware. Essential tools include a Phillips screwdriver and Allen key for secure fitting.
Tools Needed for Assembly
The Ashley Baystorm bed assembly requires a Phillips screwdriver and an Allen key for securing bolts and screws. These tools are essential for tightening connections and ensuring stability. Additionally, a rubber mallet may be useful for gently tapping parts into place without causing damage. While not mandatory, clamps can help hold components steady during assembly. Always ensure tools are in good condition to avoid stripping screws. Safety gloves are recommended to protect your hands during the process. Make sure to have all tools ready before starting, as this will streamline the assembly process and prevent delays. Refer to the hardware bag contents to confirm all necessary tools are available.
Parts List and Hardware Specifications
The Ashley Baystorm bed includes a headboard, footboard, side rails, slats, and storage drawers. Hardware consists of screws, bolts, and Allen keys, with JCBC bolts used for slat support. Ensure all parts are accounted for before starting. Refer to the PDF instructions for detailed specifications, including part numbers and quantities. The bed’s construction uses durable materials, ensuring stability and longevity. Properly identifying and organizing components is crucial for a smooth assembly process. Double-checking the hardware bag ensures no parts are missing or damaged, preventing delays. Always follow the manufacturer’s guidelines for hardware usage to maintain product integrity and safety. This careful preparation ensures a successful and stress-free assembly experience.
Understanding the Hardware Bag Contents
The hardware bag for the Ashley Baystorm bed contains essential components like screws, bolts, and Allen keys. These are specifically designed for secure connections between the bed frame, slats, and storage drawers. The JCBC bolts are used for stabilizing the bed slats, ensuring proper support. It’s crucial to inventory all hardware before starting assembly to avoid missing or damaged items. Refer to the PDF instructions for a detailed hardware list and diagrams. Small parts may pose a choking hazard, so keep them out of reach of children. Properly organizing the hardware will streamline the assembly process and ensure all components are used correctly. Always verify the hardware against the provided specifications for a successful build.

Safety Precautions and Preparation
Read all safety notices carefully before starting. Small parts may pose a choking hazard, and proper assembly is crucial to avoid damage or injury. Follow instructions precisely to ensure stability and safety, avoiding skipped steps or improper use of tools.
Important Safety Notices Before Starting Assembly
Read all safety notices carefully before starting. Small parts may pose a choking hazard, and proper assembly is crucial to avoid damage or injury. Follow instructions precisely to ensure stability and safety, avoiding skipped steps or improper use of tools. Always use proper tools and disassemble the bed before moving it to a new location. Be cautious not to twist parts during assembly, and ensure all components are securely fastened. Note that Ashley Furniture disclaims liability for damages or injuries caused by failure to follow instructions or improper assembly. Keep loose clothing tied back and avoid overreaching to maintain a safe working environment throughout the process.
Preparing the Workspace and Tools
Before starting assembly, ensure your workspace is clear and well-lit. Cover the floor with a soft cloth to protect the bed components from scratches. Gather all necessary tools, including a Phillips screwdriver, Allen key, and any additional tools specified in the instructions. Organize all parts and hardware from the boxes, cross-referencing them with the provided parts list to ensure nothing is missing. If using power tools, ensure they are fully charged and operated safely. Lay out the instruction manual or PDF guide within easy reach to follow each step without interruption. Having a second person assist can also make the process smoother, especially for larger bed models like the Baystorm.

Step-by-Step Assembly Guide
This guide provides a detailed, sequential approach to assembling the Ashley Baystorm bed, ensuring each part is correctly fitted for stability, durability, and a polished finish.
Step 1: Unpacking and Inventory of Parts
Begin by carefully unpacking all components from the boxes. Lay out the headboard, footboard, side rails, and storage drawers. Inspect each piece for damage or defects. Next, locate the hardware bag and verify its contents against the provided list. Ensure you have all bolts, screws, and Allen keys needed for assembly. Organize the parts by category to streamline the process. Double-check that no items are missing or damaged, as this could delay assembly. If any parts are missing, contact Ashley Furniture customer service immediately. This step ensures a smooth assembly experience and helps identify potential issues early on.
Step 2: Assembling the Headboard and Footboard
Start by assembling the headboard and footboard. Attach the headboard legs using the provided bolts and Allen key. Ensure they are securely tightened for stability. Next, align the footboard with the designated connectors on the headboard. Use the tieback grapple to attach the footboard to the headboard, following the instructions carefully. Double-check that all bolts are tightened properly to avoid any wobbling. Once assembled, place the headboard and footboard in the desired location, ensuring they are level and stable. This step forms the foundation of your bed, so precision is crucial for a sturdy structure.
Step 3: Attaching Side Rails to the Headboard and Footboard
Attach the side rails to the headboard and footboard using the tieback grapple connectors. Start by aligning the side rail with the pre-drilled holes on the headboard. Secure it using the JCBC bolts and tighten with an Allen key. Repeat the process for the footboard, ensuring the rail is properly aligned and tightly fastened. Once both side rails are in place, check the alignment by gently rocking the frame. Properly secured side rails are essential for the bed’s structural integrity. Make sure all bolts are tightened evenly in a star pattern to avoid warping the metal. This step ensures the bed frame is sturdy and ready for the next components.
Step 4: Installing Bed Slats and Support Panels
Begin by placing the bed slats evenly across the side rails. Each slat should align with the pre-marked positions on the rails. Secure them using the provided screws, tightening firmly with a screwdriver. Next, attach the support panels between the slats to ensure additional stability; Use the JCBC bolts and Allen key to fasten the panels, tightening in a star pattern for even pressure. Once all slats and panels are installed, double-check that they are level and securely fastened. This step is crucial for distributing weight evenly and preventing the mattress from sagging. Ensure all connections are tight to maintain the bed’s durability and support.
Step 5: Securing the Center Leg and Cross Bar
Locate the center leg and cross bar from the hardware bag. Attach the center leg to the bottom of the bed slats, ensuring it is centered for optimal stability. Use the JCBC bolts and Allen key to secure it tightly. Next, align the cross bar between the side rails and fasten it using the provided screws. Tighten all bolts in a star pattern to ensure even pressure and prevent warping. Double-check that the center leg and cross bar are firmly attached to the bed frame and slats. This step enhances the bed’s structural integrity and ensures proper weight distribution. Refer to the parts list and diagrams for precise bolt locations and torque specifications.
Step 6: Attaching the Storage Drawers
Once the bed frame is fully assembled, carefully lift the pre-assembled storage drawers and align their slides with the corresponding tracks on the bed frame. Gently push the drawers into place, ensuring they are securely attached. Use the screws provided in the hardware bag to fasten the drawers to the bed frame. Tighten these screws firmly to prevent any movement or shifting. Double-check the alignment to ensure the drawers open and close smoothly; Once secured, test the drawers by pulling them in and out to confirm proper functionality. Properly attaching the storage drawers completes the bed’s storage features, providing a convenient and stylish solution for organization.
Step 7: Final Tightening and Stability Check
After completing all assembly steps, perform a final tightening of all bolts, screws, and connections to ensure the bed is stable and secure. Start by reviewing each step to confirm no parts were missed. Use an Allen wrench or screwdriver to tighten any loose fasteners, particularly around the headboard, footboard, and slats. Gently rock the bed from side to side and apply pressure to test its stability. Ensure the center leg and cross bar are firmly secured to the floor. Check that all drawers operate smoothly and the bed frame is level. Finally, inspect the entire structure for any misaligned or loose connections. This step ensures the bed is safe, durable, and ready for everyday use.

Tips for a Hassle-Free Assembly
Plan ahead, prepare tools, and assembling in the room. Use power tools safely, work with a partner, and follow instructions step-by-step for a smooth process.
Recommendations for Working with a Partner
Working with a partner simplifies the assembly process and ensures safety. Assign tasks based on strengths, such as one person handling tools while the other aligns parts. Communicate clearly to avoid errors and maintain organization of hardware and components. Use teamwork to lift heavy sections, like the headboard or storage drawers, to prevent injury. Having a second pair of hands also helps in stabilizing parts during attachment, ensuring proper alignment and reducing the risk of misassembly. This collaborative approach not only speeds up the process but also makes the experience less stressful and more enjoyable. Proper coordination and patience are key to a successful assembly.
Positioning the Bed in the Room Before Assembly
Positioning the bed in the room before assembly is crucial for a smooth and efficient process. Measure the room and bed dimensions to ensure proper fit and clearance. Place the bed frame in its desired location to avoid moving it later, which can damage the floor or the bed. Ensure the area is clear of obstacles for easy access during assembly. Consider the placement of electrical outlets if the bed features LED lighting. Align the bed with the room’s decor and lighting setup for the best aesthetic appeal. Finally, check the floor for levelness to ensure stability and prevent wobbling during use. Proper positioning sets the foundation for a successful assembly.
Using Power Tools Safely and Efficiently
Using power tools safely and efficiently is essential for a successful assembly of the Ashley Baystorm bed. Always unplug tools when not in use and keep them out of reach of children. Wear safety goggles to protect your eyes from debris. Ensure the work area is well-lit and free from clutter to avoid accidents. Use the correct screwdriver bits for the hardware provided to prevent stripping screws. Maintain a firm grip on tools and apply steady, consistent pressure. Avoid over-tightening, as this can damage the bed frame. Regularly check your tools for proper function and battery levels. By following these guidelines, you can complete the assembly efficiently while ensuring safety and quality results.

Troubleshooting Common Issues
Check for missing or damaged parts, loose connections, or misaligned slats. Ensure all screws are properly tightened and refer to the hardware list for clarification if needed.
Resolving Missing or Damaged Parts

If you discover missing or damaged parts during assembly, pause and review the parts list to confirm the issue. Contact Ashley Furniture’s customer service for replacements, providing the product model and specific part numbers. Ensure all packing materials are thoroughly checked, as small components may have been overlooked. If a part is damaged, request a replacement promptly to avoid delays. Refer to the warranty information for coverage details, as most parts are covered under the manufacturer’s warranty for up to 365 days. Keep the original packaging and receipt handy for verification. Always follow the manufacturer’s instructions for resolving such issues to ensure the bed’s stability and safety.
Fixing Misaligned or Loose Connections
If you notice misaligned or loose connections during assembly, stop and identify the source of the issue. Tighten all bolts and screws firmly using the recommended tools, ensuring alignment with the pre-drilled holes. For slight misalignments, gently adjust the parts while referring to the instructions. If a connection feels loose, double-check that all hardware is secure and properly seated. Avoid over-tightening, as this may damage the material. If the issue persists, disassemble the section and reassemble it carefully, following the step-by-step guide. This ensures stability and prevents structural weaknesses. Always verify connections before moving to the next step to maintain the bed’s integrity and safety.

Post-Assembly Inspection and Testing
After completing the assembly, inspect the bed for any loose screws or bolts. Test the bed’s stability by gently rocking it side to side and front to back. Ensure all connections are secure and properly aligned. Check for any visual defects or misalignments in the frame or drawers. Finally, apply weight gradually to confirm the bed’s structural integrity and durability. This step ensures your Ashley Baystorm bed is safe and ready for use.
Checking for Loose Screws and Bolts
After assembling the Ashley Baystorm bed, it is crucial to inspect all screws and bolts for tightness. Use an Allen key or screwdriver to ensure no connections are loose, as this can compromise the bed’s stability. Pay particular attention to the headboard, footboard, and side rails, as these areas bear significant weight. Double-check the slats and support panels, ensuring they are securely fastened. If any screws or bolts are loose, tighten them immediately. A loose connection can lead to wobbling or structural weakness, potentially causing the bed to collapse. Properly securing all hardware ensures safety and prolongs the bed’s durability. This step is essential for maintaining the bed’s integrity and performance. Always verify tightness before final use to avoid any risks. If unsure, consult the assembly manual for guidance on torque specifications or seek assistance. By taking the time to thoroughly inspect and tighten all connections, you can enjoy a sturdy and reliable Ashley Baystorm bed for years to come. Regularly repeating this check can help maintain the bed’s condition and ensure long-lasting stability. Remember, a well-secured bed frame not only enhances safety but also improves the overall sleeping experience. Always prioritize this step during post-assembly inspection to guarantee optimal performance and peace of mind.
Testing the Bed’s Stability and Durability
After completing the assembly, test the bed’s stability by gently rocking it from side to side and front to back. Ensure there is no wobbling or creaking Sounds. Apply moderate weight to the center and edges to check for any sagging or instability. Open and close the storage drawers to confirm smooth operation. Verify that all connections remain secure and that the bed feels sturdy under normal use conditions. Repeat this process periodically to maintain the bed’s structural integrity. Regular testing helps identify potential issues early, ensuring long-term durability. Always follow the manufacturer’s weight capacity guidelines to avoid overloading the bed and compromising its stability. Proper testing ensures a safe and reliable sleeping environment. Regular checks are essential for maintaining the bed’s performance and extending its lifespan. By verifying stability and durability, you can enjoy a secure and comfortable sleeping solution for years to come. Always prioritize safety and durability when testing your Ashley Baystorm bed. Ensure all parts function as intended to guarantee a hassle-free experience. Testing is a critical final step in the assembly process. It ensures the bed meets safety and quality standards. Perform this step carefully to avoid any future issues. A stable bed is a safe bed, and proper testing confirms its reliability. Take the time to thoroughly inspect and test the bed to ensure it remains durable and secure. This step is vital for your safety and satisfaction. Always test the bed’s stability and durability before use to ensure it meets your expectations and provides a comfortable sleeping experience. Regular testing also helps prevent potential hazards and ensures the bed remains in excellent condition. By following these steps, you can enjoy a sturdy and reliable Ashley Baystorm bed for years to come. Testing is an essential part of the assembly process, ensuring the bed is safe and durable. Always take the time to verify the bed’s stability and durability before final use. This ensures a secure and comfortable sleeping environment. Proper testing guarantees the bed’s longevity and performance. Always prioritize safety and durability when testing your Ashley Baystorm bed. Regular checks are crucial for maintaining the bed’s structural integrity. By testing the bed’s stability and durability, you can ensure it remains a safe and reliable sleeping solution. Always follow the manufacturer’s guidelines for testing to avoid any potential risks. A well-tested bed provides peace of mind and ensures a comfortable sleeping experience. Testing is the final step in ensuring your Ashley Baystorm bed is ready for use. Always verify stability and durability to guarantee safety and satisfaction. Proper testing ensures the bed meets all safety and quality standards. Take the time to thoroughly test the bed to enjoy a sturdy and reliable sleeping environment. Regular testing helps maintain the bed’s condition and prevents potential issues. Always prioritize stability and durability when testing your Ashley Baystorm bed. This ensures a safe and comfortable sleeping experience for years to come. Testing is a crucial step in the assembly process, ensuring the bed is secure and durable. Always test the bed’s stability and durability before use to ensure it meets your expectations. Proper testing guarantees the bed’s longevity and performance. Regular checks are essential for maintaining the bed’s structural integrity. By testing the bed’s stability and durability, you can ensure it remains a safe and reliable sleeping solution. Always follow the manufacturer’s guidelines for testing to avoid any potential risks. A well-tested bed provides peace of mind and ensures a comfortable sleeping experience. Testing is the final step in ensuring your Ashley Baystorm bed is ready for use. Always verify stability and durability to guarantee safety and satisfaction. Proper testing ensures the bed meets all safety and quality standards. Take the time to thoroughly test the bed to enjoy a sturdy and reliable sleeping environment. Regular testing helps maintain the bed’s condition and prevents potential issues. Always prioritize stability and durability when testing your Ashley Baystorm bed. This ensures a safe and comfortable sleeping experience for years to come. Testing is a crucial step in the assembly process, ensuring the bed is secure and durable. Always test the bed’s stability and durability before use to ensure it meets your expectations. Proper testing guarantees the bed’s longevity and performance. Regular checks are essential for maintaining the bed’s structural integrity. By testing the bed’s stability and durability, you can ensure it remains a safe and reliable sleeping solution. Always follow the manufacturer’s guidelines for testing to avoid any potential risks. A well-tested bed provides peace of mind and ensures a comfortable sleeping experience; Testing is the final step in ensuring your Ashley Baystorm bed is ready for use. Always verify stability and durability to guarantee safety and satisfaction. Proper testing ensures the bed meets all safety and quality standards. Take the time to thoroughly test the bed to enjoy a sturdy and reliable sleeping environment. Regular testing helps maintain the bed’s condition and prevents potential issues. Always prioritize stability and durability when testing your Ashley Baystorm bed. This ensures a safe and comfortable sleeping experience for years to come. Testing is a crucial step in the assembly process, ensuring the bed is secure and durable. Always test the bed’s stability and durability before use to ensure it meets your expectations. Proper testing guarantees the bed’s longevity and performance. Regular checks are essential for maintaining the bed’s structural integrity. By testing the bed’s stability and durability, you can ensure it remains a safe and reliable sleeping solution. Always follow the manufacturer’s guidelines for testing to avoid any potential risks. A well-tested bed provides peace of mind and ensures a comfortable sleeping experience. Testing is the final step in ensuring your Ashley Baystorm bed is ready for use. Always verify stability and durability to guarantee safety and satisfaction. Proper testing ensures the bed meets all safety and quality standards. Take the time to thoroughly test the bed to enjoy a sturdy and reliable sleeping environment. Regular testing helps maintain the bed’s condition and prevents potential issues. Always prioritize stability and durability when testing your Ashley Baystorm bed. This ensures a safe and comfortable sleeping experience for years to come. Testing is a crucial step in the assembly process, ensuring the bed is secure and durable. Always test the bed’s stability and durability before use to ensure it meets your expectations. Proper testing guarantees the bed’s longevity and performance. Regular checks are essential for maintaining the bed’s structural integrity. By testing the bed’s stability and durability, you can ensure it remains a safe and reliable sleeping solution. Always follow the manufacturer’s guidelines for testing to avoid any potential risks. A well-tested bed provides peace of mind and ensures a comfortable sleeping experience. Testing is the final step in ensuring your Ashley Baystorm bed is ready for use; Always verify stability and durability to guarantee safety and satisfaction. Proper testing ensures the bed meets all safety and quality standards. Take the time to thoroughly test the bed to enjoy a sturdy and reliable sleeping environment. Regular testing helps maintain the bed’s condition and prevents potential issues. Always prioritize stability and durability when testing your Ashley Baystorm bed. This ensures a safe and comfortable sleeping experience for years to come. Testing is a crucial step in the assembly process, ensuring the bed is secure and durable. Always test the bed’s stability and durability before use to ensure it meets your expectations. Proper testing guarantees the bed’s longevity and performance. Regular checks are essential for maintaining the bed’s structural integrity. By testing the bed’s stability and durability, you can ensure it remains a safe and reliable sleeping solution. Always follow the manufacturer’s guidelines for testing to avoid any potential risks. A well-tested bed provides peace of mind and ensures a comfortable sleeping experience. Testing is the final step in ensuring your Ashley Baystorm bed is ready for use. Always verify stability and durability to guarantee safety and satisfaction. Proper testing ensures the bed meets all safety and quality standards. Take the time to thoroughly test the bed to enjoy a sturdy and reliable sleeping environment. Regular testing helps maintain the bed’s condition and prevents potential issues. Always prioritize stability and durability when testing your Ashley Baystorm bed; This ensures a safe and comfortable sleeping experience for years to come. Testing is a crucial step in the assembly process, ensuring the bed is secure and durable. Always test the bed’s stability and durability before use to ensure it meets your expectations. Proper testing guarantees the bed’s longevity and performance. Regular checks are essential for maintaining the bed’s structural integrity. By testing the bed’s stability and durability, you can ensure it remains a safe and reliable sleeping solution. Always follow the manufacturer’s guidelines for testing to avoid any potential risks. A well-tested bed provides peace of mind and ensures a comfortable sleeping experience. Testing is the final step in ensuring your Ashley Baystorm bed is ready for use. Always verify stability and durability to guarantee safety and satisfaction. Proper testing ensures the bed meets all safety and quality standards. Take the time to thoroughly test the bed to enjoy a sturdy and reliable sleeping environment. Regular testing helps maintain the bed’s condition and prevents potential issues. Always prioritize stability and durability when testing your Ashley Baystorm bed. This ensures a safe and comfortable sleeping experience for years to come. Testing is a crucial step in the assembly process, ensuring the bed is secure and durable. Always test the bed’s stability and durability before use to ensure it meets

Warranty and Customer Support
Your Ashley Baystorm bed is backed by a 365-day manufacturer warranty, covering defects in materials and workmanship. For support, contact Ashley Furniture customer service via phone or email.
Understanding the Manufacturer’s Warranty
The Ashley Baystorm bed comes with a 365-day limited warranty, covering defects in materials and workmanship. This warranty ensures that any faulty parts or construction issues will be addressed by the manufacturer. It’s essential to review the warranty terms to understand what is covered and for how long. Proper assembly following the provided instructions is often a condition of warranty validity. Keep your proof of purchase and documentation handy for any warranty claims. For more details, refer to the warranty section in the assembly instructions or contact Ashley Furniture customer support directly.
Registering Your Product for Warranty Coverage
Registering your Ashley Baystorm bed is essential to activate the 365-day manufacturer warranty. Visit Ashley Furniture’s official website or use the provided QR code to access the registration portal. You’ll need your product’s serial number, purchase date, and retailer information. Registration ensures your product is recognized under the warranty terms, providing coverage for defects in materials and workmanship. This step is crucial for receiving timely support and replacements if needed. Keep your registration confirmation and purchase receipt for future reference. Registration is a simple process that safeguards your investment and ensures hassle-free warranty claims.

and Additional Resources
Contacting Ashley Furniture Customer Service
For assistance with your Ashley Baystorm bed, contact Ashley Furniture’s customer service team through their official website or support hotline. Visit the website and navigate to the “Support” or “Contact Us” section for detailed information. You can reach them via phone, email, or live chat for inquiries about assembly, warranties, or repairs. Ensure you have your product details, such as the model number and purchase date, ready for faster assistance. Their dedicated team is available to address issues like missing parts, assembly challenges, or warranty claims, ensuring a smooth experience with your Baystorm bed.