Minn Kota Trolling Motor Wiring Guide: A Comprehensive Plan (Updated 03/24/2026)
Today’s date is 03/24/2026 06:37:12. This comprehensive guide unlocks your Minn Kota’s potential‚ offering detailed instructions for a successful wiring experience.
Minn Kota has long been a trusted name in marine technology‚ renowned for crafting reliable and innovative trolling motors. These motors empower anglers with precise boat control‚ enhancing their fishing experience. Understanding the electrical system is crucial for optimal performance and longevity.
This guide focuses on the wiring aspects of Minn Kota trolling motors‚ covering everything from basic connections to advanced configurations. Whether you’re a seasoned angler or a first-time boat owner‚ this resource will demystify the wiring process. Proper installation ensures safe and efficient operation‚ maximizing your time on the water. Welcome to mastering your Minn Kota!
Safety Precautions & Warnings
Electrical safety is paramount when working with Minn Kota trolling motors. Always disconnect the battery before commencing any wiring work to prevent accidental shorts and potential injury. Utilize properly insulated tools and wear appropriate safety gear‚ including eye protection.
Ensure the wiring area is dry and well-ventilated. Never work with damaged wiring or components. Incorrect wiring can lead to fire hazards or motor malfunction. If unsure about any step‚ consult a qualified marine electrician. Prioritize safety to protect yourself and your equipment during the installation process.
Understanding Trolling Motor Voltage Systems

Minn Kota trolling motors operate on various voltage systems – 12V‚ 24V‚ and 36V – each influencing power and runtime. 12-volt systems are ideal for smaller boats and calmer waters‚ offering sufficient power for basic trolling needs.
24-volt systems‚ created by connecting two 12V batteries in series‚ provide increased thrust and extended runtimes‚ suitable for medium-sized boats. 36-volt systems‚ utilizing three 12V batteries in series‚ deliver maximum power for larger boats and challenging conditions. Selecting the correct voltage is crucial for optimal performance.
12-Volt Systems
12-volt Minn Kota systems are the simplest to install‚ requiring only a single marine battery. These systems are perfect for smaller boats‚ kayaks‚ or canoes‚ providing reliable power for recreational trolling. Wiring is straightforward‚ typically involving connecting the motor directly to the battery terminals with appropriately sized cables.
Ensure a secure connection and proper polarity. A fuse should always be installed close to the battery to protect the wiring and motor. While offering less thrust than higher voltage systems‚ 12V setups are cost-effective and easy to maintain.
24-Volt Systems
24-volt Minn Kota trolling motors deliver significantly more power and runtime compared to 12-volt systems‚ ideal for larger boats and demanding conditions. These systems require two 12-volt marine batteries connected in series. This series connection increases the voltage while maintaining the same amp-hour capacity.
Proper wiring is crucial; incorrect connections can damage the motor or batteries. Dual battery considerations include using identical batteries for optimal performance and investing in a battery charger capable of charging both batteries simultaneously. A 24V system provides a balance of power and efficiency.
36-Volt Systems
36-volt Minn Kota trolling motors represent the pinnacle of freshwater performance‚ offering exceptional power and extended runtime for larger vessels and challenging environments. These systems necessitate three 12-volt marine batteries connected in series. This configuration boosts voltage to 36V while preserving the overall amp-hour capacity.
Effective three-battery system management is vital‚ including regular monitoring and maintenance. Utilizing a dedicated three-bank marine charger ensures balanced charging. These systems demand careful wiring and robust connections for reliable operation and longevity.
Essential Tools & Materials
Successfully wiring your Minn Kota trolling motor requires specific tools and materials for a safe and reliable installation. You’ll need wire strippers‚ crimpers‚ and a multimeter for testing connections. Marine-grade heat shrink tubing and connectors are crucial for corrosion resistance.
Essential materials include appropriately gauged marine-grade wire (detailed later)‚ a fuse holder and fuses‚ and terminal connectors. A screwdriver set‚ pliers‚ and potentially a drill with appropriate bits are also necessary. Always prioritize quality components designed for marine environments to ensure longevity and safety.
Wiring Diagram Basics & Symbols
Understanding wiring diagrams is fundamental to a successful Minn Kota installation. Diagrams utilize standardized symbols to represent components: batteries‚ motors‚ switches‚ and connectors. A solid line signifies a wire‚ while dashed lines often indicate ground connections.
Symbols for fuses‚ circuit breakers‚ and terminals are also common. Pay close attention to color coding‚ as it denotes positive and negative leads. Familiarize yourself with these symbols before beginning; misinterpreting them can lead to incorrect wiring and potential damage. Refer to Minn Kota’s official documentation for specific symbol definitions.

Battery Connection Guidelines
Proper battery connection is crucial for optimal Minn Kota performance and longevity. Always connect batteries before connecting the trolling motor to the wiring harness. Ensure batteries are fully charged and of the same type and age for balanced output.
Securely tighten all connections to prevent corrosion and voltage drop. Use marine-grade terminals and cable ends. Double-check polarity – reversing connections can severely damage the motor and potentially void the warranty. Disconnect the motor when not in use to conserve battery life and prevent accidental activation.
Series vs. Parallel Battery Connections
Understanding series and parallel connections is vital for achieving the correct voltage for your Minn Kota. Series connections increase voltage while maintaining amperage; connect positive to negative between batteries. This is used for 24V and 36V systems.
Parallel connections increase amperage while maintaining voltage; connect positive to positive and negative to negative. This extends run time but isn’t typically used for trolling motors. Always adhere to Minn Kota’s recommendations for your specific motor’s voltage requirements to avoid damage.
Proper Battery Cable Gauge

Selecting the correct battery cable gauge is crucial for safe and efficient power delivery to your Minn Kota trolling motor. Undersized cables can overheat‚ causing voltage drop and reduced performance. For 12-volt systems‚ 10 AWG cable is generally sufficient‚ but longer runs may require 8 AWG.
24 and 36-volt systems demand heavier gauge cables – typically 8 AWG or even 6 AWG‚ depending on the motor’s amperage draw and cable length. Always consult Minn Kota’s specifications for your model to ensure optimal wiring.
Wiring a 12-Volt Minn Kota Trolling Motor
Wiring a 12-volt system is the simplest configuration. Begin by connecting a 10 AWG cable from the positive terminal of your battery to the corresponding positive wire on the trolling motor’s wiring harness. Securely attach the negative cable from the battery’s negative terminal to the motor’s negative wire.
Ensure all connections are tight and corrosion-free. Install an inline fuse as close to the battery as possible for safety. Finally‚ connect the foot pedal wiring according to the manufacturer’s instructions‚ verifying proper polarity before testing.
Basic 12V Wiring Schematic
A basic 12V schematic illustrates a direct connection. The battery’s positive (+) terminal connects via a 10 AWG wire and inline fuse to the motor’s positive (+) wire. Similarly‚ the battery’s negative (-) terminal connects to the motor’s negative (-) wire using a matching gauge cable.
The foot pedal typically connects to a designated port on the motor‚ requiring a separate‚ smaller gauge wire. Proper polarity is crucial; reversing connections can damage the motor. Always double-check the schematic before finalizing connections for optimal performance and safety.
Installing the Foot Pedal
Foot pedal installation involves connecting its cable to the designated port on the trolling motor’s control head. Ensure a secure connection‚ often utilizing a keyed connector to prevent accidental disconnections. Route the cable neatly‚ avoiding sharp bends or potential pinch points.
Proper cable management is vital for durability and responsiveness. Test the pedal’s functionality – speed control and directional steering – after connection. Verify smooth operation before heading out on the water. A correctly installed foot pedal provides intuitive control over your Minn Kota motor.
Wiring a 24-Volt Minn Kota Trolling Motor
Wiring a 24-volt system requires connecting two 12-volt batteries in series. This configuration increases voltage while maintaining the same amp-hour capacity. Carefully connect the positive terminal of the first battery to the negative terminal of the second.

Use appropriately sized cables to handle the increased current draw. Connect the negative terminal of the first battery and the positive terminal of the second to the trolling motor. Double-check polarity before final connection to avoid damage. A 24V system delivers enhanced power and runtime.
24V Series Connection Diagram
Visualize this: Battery 1’s positive (+) terminal connects directly to Battery 2’s negative (-) terminal. This is the core of a series connection. The remaining negative (-) terminal on Battery 1 becomes your system’s negative (-) output.
Similarly‚ the remaining positive (+) terminal on Battery 2 serves as your system’s positive (+) output‚ feeding directly into the trolling motor. Ensure secure connections using appropriate terminals and cable gauges. Proper wiring guarantees optimal performance and prevents potential damage to your Minn Kota motor.
Dual Battery Considerations for 24V
When utilizing a 24-volt system‚ selecting identical batteries is paramount for consistent performance and longevity. Match both batteries in terms of amp-hour (Ah) rating‚ age‚ and type – ideally‚ deep-cycle marine batteries. Uneven batteries can lead to premature failure and reduced runtime.
Regularly inspect both batteries for corrosion and ensure terminals are clean and tight. Consider a battery balancer to maintain equal charge levels‚ maximizing efficiency. Proper battery maintenance is crucial for a reliable 24V Minn Kota experience.
Wiring a 36-Volt Minn Kota Trolling Motor
A 36-volt system demands meticulous wiring for optimal performance and safety. This configuration utilizes three 12-volt deep-cycle marine batteries connected in series. Ensure all batteries are identical in age‚ type‚ and amp-hour rating to prevent imbalances. Begin by connecting the positive terminal of the first battery to the negative terminal of the second‚ and repeat with the third.
Double-check all connections for tightness and proper polarity before connecting to the trolling motor. Utilize appropriately gauged wiring to handle the increased current draw. Always prioritize safety and disconnect the system when not in use.
36V Series Connection Diagram
Visualize three 12V batteries aligned in a row. Begin by connecting a heavy-gauge wire from the positive (+) terminal of Battery 1 to the negative (-) terminal of Battery 2. Next‚ connect a similar wire from the positive (+) terminal of Battery 2 to the negative (-) terminal of Battery 3.
The negative (-) terminal of Battery 1 becomes your system’s negative connection‚ and the positive (+) terminal of Battery 3 is your system’s positive connection. These are the points to connect to your 36V Minn Kota trolling motor. Ensure secure connections and proper insulation to prevent shorts.
Three Battery System Management
Maintaining three batteries requires diligence. Regularly check each battery’s voltage with a multimeter‚ ensuring they remain balanced – ideally within 0.2V of each other. Utilize a three-bank battery charger designed for deep-cycle marine batteries to maintain optimal charge levels and prevent imbalances.
Rotate battery positions periodically to equalize wear and tear. Consider a battery monitoring system for real-time voltage and current readings. Properly ventilate the battery compartment to dissipate any hydrogen gas produced during charging. Regular inspection for corrosion is crucial for longevity;
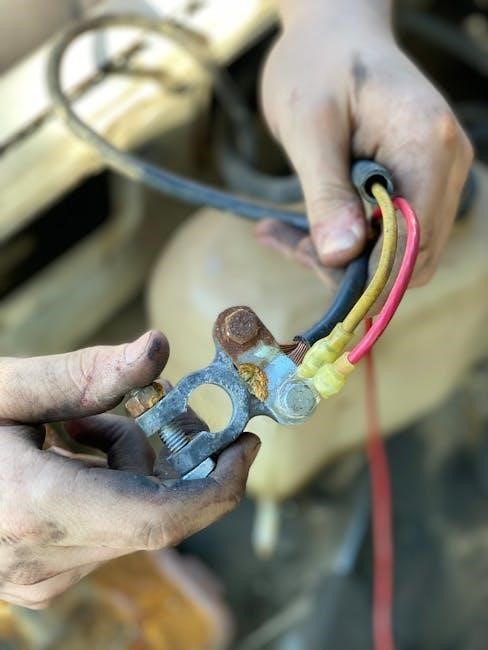
Connecting the Trolling Motor to the Battery
Before connecting‚ double-check polarity! Red to positive (+)‚ black to negative (-); Use appropriately sized marine-grade cable – consult the gauge chart for your motor’s amperage. Ensure connections are clean and tight‚ preventing voltage drop and overheating. Apply dielectric grease to terminals to inhibit corrosion.
Securely mount the battery to prevent shifting during operation. Install a fuse as close to the battery as possible‚ protecting the wiring. Verify all connections before powering on the motor. Inspect wiring regularly for damage or wear.
Understanding the Minn Kota Wiring Harness
The Minn Kota wiring harness is pre-wired for simplified installation‚ featuring color-coded wires for easy identification. Key components include the power leads (red & black)‚ steering control wires‚ and foot pedal connections. Inspect the harness for any damage before installation.
Understand the function of each wire before connecting. Properly route the harness to avoid strain or abrasion. Secure the harness with cable ties to prevent entanglement. Refer to your motor’s specific wiring diagram for accurate connections. Avoid modifying the harness unless absolutely necessary.
Installing and Wiring the Steering Control
Begin by mounting the steering control head securely to the boat’s surface‚ ensuring comfortable reach. Connect the steering control wires to the corresponding terminals on the trolling motor’s wiring harness – typically utilizing a keyed connector. Verify proper polarity before tightening connections.
Test the steering functionality after wiring‚ confirming smooth and responsive operation. Securely route the steering control cable‚ avoiding sharp bends or obstructions. Double-check all connections for tightness and insulation. Refer to the motor’s diagram for specific wiring configurations.
Troubleshooting Common Wiring Issues
If the motor lacks power‚ first inspect the battery connections for corrosion or looseness. Check the fuse – a blown fuse is a frequent culprit. Intermittent power often indicates a loose wire or corroded connector; carefully examine the entire wiring harness.
Use a multimeter to test voltage at various points in the circuit. Ensure proper battery voltage for the system (12V‚ 24V‚ or 36V). Look for damaged wires or insulation. Consult the wiring diagram to trace the circuit and isolate the problem area effectively.
No Power to the Motor
A complete lack of power typically points to a few key areas. Begin by verifying battery charge – low batteries are a common cause; Inspect the main power cable connecting to the trolling motor for any breaks or loose connections. Check the circuit breaker or fuse protecting the motor; a tripped breaker or blown fuse cuts power.
Confirm the battery switch is in the “on” position. Use a voltmeter to test voltage directly at the motor’s wiring harness. Ensure proper polarity – reversed connections can prevent operation. Inspect the foot pedal connection as well.
Intermittent Power
Intermittent power issues are often more challenging to diagnose than a complete power loss. Start by checking all battery connections for corrosion or looseness; even slight resistance can cause dropouts. Wiggle the wiring harness while the motor is running to see if it triggers a power interruption – indicating a broken wire internally.
Inspect the foot pedal cable for damage and ensure a secure connection. Consider a failing battery that struggles under load. Check the circuit breaker for signs of intermittent tripping. Voltage fluctuations can also be a culprit‚ test while running.
Using a Minn Kota Digital Maximizer
Minn Kota’s Digital Maximizer dramatically extends battery life by delivering power efficiently. Wiring is generally straightforward‚ connecting directly into the trolling motor’s existing wiring harness. Ensure proper polarity during installation – red to positive‚ black to negative. The Maximizer automatically adjusts power output based on speed and load.
Verify the unit is securely mounted and protected from water exposure. Check the fuse within the Maximizer itself. Proper installation ensures optimal performance and maximizes runtime; Monitor battery voltage to confirm the Maximizer is functioning correctly‚ providing significant power savings.
Wiring for Minn Kota i-Pilot & i-Pilot Link
i-Pilot and i-Pilot Link systems require careful wiring for full functionality. Connect the co-pilot remote to the designated port on the trolling motor. Ensure secure connections to prevent signal loss and erratic behavior. The GPS module needs a clear view of the sky for accurate positioning.
Power is typically drawn from the main battery connection. Verify compatibility with your trolling motor’s voltage. Follow the manufacturer’s instructions precisely for optimal performance. Proper wiring unlocks features like Spot-Lock‚ AutoPilot‚ and i-Tracks‚ enhancing your boating experience;
Fuse Selection & Placement
Proper fuse selection is crucial for protecting your Minn Kota trolling motor and electrical system. Choose a fuse rated slightly higher than the motor’s maximum amperage draw‚ preventing nuisance tripping. Placement should be as close as possible to the battery positive terminal‚ safeguarding the entire circuit.
Use marine-grade fuses and waterproof fuse holders to resist corrosion. Regularly inspect fuses for signs of damage or corrosion. A blown fuse indicates a short circuit or overload; address the underlying issue before replacing it. Correct fusing prevents costly damage and ensures safe operation.
Wire Corrosion Prevention
Marine environments are harsh on electrical connections‚ making corrosion prevention vital for reliable Minn Kota operation. Utilize tinned copper wiring‚ specifically designed to resist corrosion. Apply dielectric grease liberally to all connections‚ creating a waterproof barrier. Heat-shrink tubing provides excellent protection against moisture intrusion.
Regularly inspect wiring for signs of corrosion‚ such as green or white residue. Clean corroded connections with a wire brush and reapply dielectric grease. Consider using a corrosion inhibitor spray for added protection. Proper preventative measures extend wiring lifespan and ensure consistent performance.
Maintaining Your Trolling Motor Wiring
Consistent maintenance is crucial for a long-lasting Minn Kota wiring system. Regularly inspect all connections for looseness‚ corrosion‚ or damage. Tighten any loose connections immediately to prevent intermittent power issues. Clean battery terminals and cable ends with a wire brush to ensure optimal conductivity.
Periodically check the wiring harness for chafing or wear‚ especially near moving parts. Replace damaged wiring promptly to avoid shorts or failures. Apply dielectric grease to connections annually. Proper upkeep guarantees reliable performance and prevents costly repairs down the line.
Advanced Wiring Configurations (CoPilot‚ etc.)
Minn Kota’s CoPilot system‚ and similar advanced setups‚ demand meticulous wiring for optimal functionality. These configurations often involve additional wiring for remote operation and enhanced control. Carefully follow the manufacturer’s specific wiring diagrams for CoPilot installation‚ paying close attention to cable routing and connector types.
Ensure proper grounding and shielding to prevent interference. Consider using a dedicated wiring harness for CoPilot to isolate it from the main trolling motor circuit. Professional installation is recommended for complex setups‚ guaranteeing safety and performance. Always double-check all connections before powering on the system.
Resources & Further Information
For detailed schematics and troubleshooting‚ consult the official Minn Kota website. Their support section offers a wealth of information‚ including downloadable manuals and wiring diagrams for various models. YouTube channels dedicated to marine electronics often feature helpful tutorials on Minn Kota wiring.
Online fishing forums provide a platform to connect with experienced users and seek advice. Minn Kota’s customer service is readily available via phone or email for personalized assistance. Remember to always prioritize safety and refer to qualified professionals when dealing with electrical systems. Proper research ensures a successful installation.